Are you struggling with uploading files and JSON data simultaneously in Postman while testing your Spring MVC application? This common challenge frustrates many developers, but with the right approach, you can easily test your file upload endpoints with additional parameters.
Table of Contents
- Understanding the Challenge
- Setting Up Your Spring Controller
- Uploading Files in Postman
- Adding JSON Data with File Uploads
- Passing Session IDs and Authentication
- Handling Multiple Files
- Troubleshooting Common Issues
- Best Practices
- Conclusion
Understanding the Challenge
When developing Spring MVC applications, testing file upload endpoints can be challenging, especially when you need to include additional parameters like JSON data or session IDs. Postman is an excellent tool for API testing, but configuring it correctly for multipart requests requires specific steps.
The main challenge occurs because you need to send both binary data (the file) and text data (JSON or parameters) in the same request. Additionally, many applications require authentication via session IDs or tokens.
Setting Up Your Spring Controller
Before diving into Postman configuration, let’s review a typical Spring MVC controller for file uploads:
@RequestMapping(value = "/uploadFile", method = RequestMethod.POST)
public @ResponseBody ResponseEntity<GenericResponseVO<? extends IServiceVO>> uploadFileHandler(
            @RequestParam("name") String name,
            @RequestParam("file") MultipartFile file,
            @RequestParam("jsonData") String jsonData,
            HttpServletRequest request,
            HttpServletResponse response) {

    if (!file.isEmpty()) {
        try {
            byte[] bytes = file.getBytes();

            // File handling logic here

            // Parse JSON data if needed
            ObjectMapper mapper = new ObjectMapper();
            JsonNode jsonNode = mapper.readTree(jsonData);

            // Process with both file and JSON data

            return ResponseEntity.ok(new GenericResponseVO<>("File uploaded successfully"));
        } catch (Exception e) {
            return ResponseEntity.status(HttpStatus.INTERNAL_SERVER_ERROR)
                   .body(new GenericResponseVO<>("Failed to upload file: " + e.getMessage()));
        }
    } else {
        return ResponseEntity.badRequest().body(new GenericResponseVO<>("File is empty"));
    }
}
This controller accepts a file, a name parameter, and JSON data. Now, let’s see how to test this with Postman.
Uploading Files in Postman
To upload files in Postman, follow these steps:
- Open Postman and create a new request
- Set the HTTP method to POST
- Enter your endpoint URL (e.g.,
http://localhost:8080/api/uploadFile) - Go to the Body tab
- Select form-data
- Add your parameters:
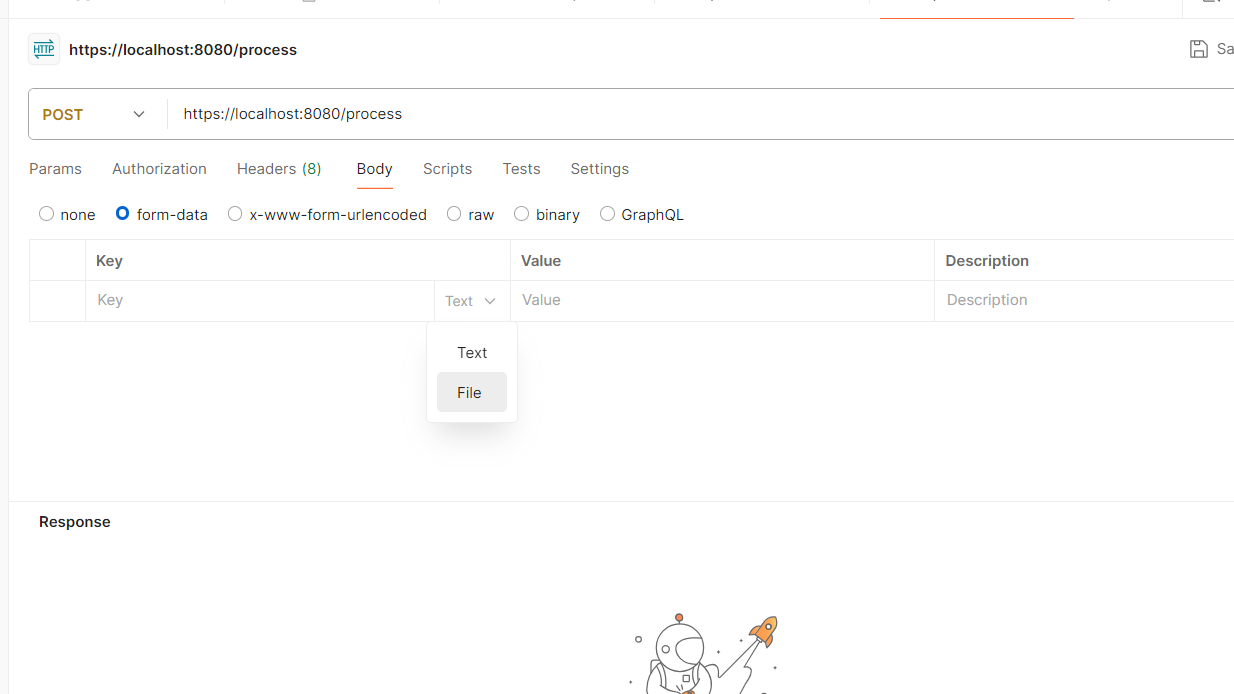
For the file parameter:
- Enter
fileas the key (matching your controller’s@RequestParam) - Click the dropdown on the right side of the key field and select File
- Click Select Files in the value field and choose your file
For text parameters (like “name”):
- Enter the parameter name as the key
- Leave the dropdown as Text
- Enter the value
Adding JSON Data with File Uploads
For including JSON data, you have two main approaches:
Approach 1: JSON as a String Parameter
- Add a key named
jsonData(matching your controller’s parameter) - Leave the type as Text
- Enter your JSON as a string in the value field:
{"id": 123, "description": "Test upload", "properties": {"category": "documents"}}
Approach 2: Using JSON Content-Type for a Parameter
If your API expects a specific parameter to be treated as JSON:
- Add a key (e.g.,
jsonData) - Click the dropdown and select Text
- Important step: Click on the “Content Type” dropdown that appears
- Select “application/json” from the dropdown
- Enter your JSON object in the value field
This second approach is particularly useful when your controller uses @RequestBody annotations for certain parameters.
Passing Session IDs and Authentication
To include session IDs in your Postman request:
For Cookie-Based Sessions:
- Go to the Cookies section in Postman
- Add your session cookie (e.g.,
JSESSIONID) - Set the value to your session ID
Alternatively, you can add the session cookie in the Headers tab:
- Go to the Headers tab
- Add a key named
Cookie - Set the value to
JSESSIONID=your_session_id_value
For Token-Based Authentication:
- Go to the Headers tab
- Add an
Authorizationheader - Set the value according to your authentication method (e.g.,
Bearer your_token_here)
For Custom Headers:
If your application uses custom session headers:
- Go to the Headers tab
- Add your custom header (e.g.,
X-Session-ID) - Set the value to your session ID
Handling Multiple Files
To upload multiple files in Postman:
- Add multiple form-data entries with the same key name
- For each entry, select File as the type
- Select different files for each entry
For a controller that accepts multiple files:
@RequestMapping(value = "/uploadMultipleFiles", method = RequestMethod.POST)
public @ResponseBody ResponseEntity<?> uploadMultipleFiles(
            @RequestParam("files") MultipartFile[] files) {
    // Handle multiple files
}
Troubleshooting Common Issues
Content-Type Errors
If you’re getting errors related to Content-Type:
- Ensure Postman is automatically setting the
Content-Type: multipart/form-dataheader - Don’t manually add this header, as Postman needs to generate the boundary value
File Size Limitations
If your file upload fails:
- Check your Spring configuration for file size limits
- Modify
application.propertiesif needed:
spring.servlet.multipart.max-file-size=10MB
spring.servlet.multipart.max-request-size=10MB
Missing Parameters
If your controller can’t find parameters:
- Double-check the parameter names in Postman match exactly with your controller’s
@RequestParamnames - Verify parameter case sensitivity
Best Practices
- Use Environment Variables: Store your base URLs and session tokens as Postman environment variables for easier management
- Create Collections: Organize related requests in collections for better organization
- Write Tests: Add Postman tests to verify your file upload endpoints work correctly
- Use Pre-request Scripts: For dynamic parameters or authentication tokens that need to be generated before each request
Conclusion
Uploading files and JSON data in Postman while testing Spring MVC applications doesn’t have to be complicated. By following this guide, you can properly configure your requests to include files, JSON data, and session IDs all in one request.
Remember that the key to successful file uploads in Postman is properly configuring the form-data body and ensuring your parameter names match those expected by your Spring controller.
Have you tried these methods? Did they work for your specific Spring MVC setup? Share your experience in the comments below or reach out if you’re still facing challenges with your implementation.